How to install PHP 7, Nginx, Mysql (LEMP) on Ubuntu
Okay the meeting this time we we will learn to make the local server on Ubuntu we use Nginx, MysQL, and PHP7. What's a LEMP? a bit about understanding the Linux MySQL Nginx IE LEMP PHP (LEMP or LNMP) is a group of open-source software to run a dynamic website, namely web that can perform interaction with visitors. LEMP was not much different from the LAMP (Linux, Apache, MySQL and PHP) because they have the same function, only to be replaced by apache web server nginx (Engine X) so changed its abbreviation became LNMP or LEMP. Okay just get started.
type this command to install NGINX: # sudo apt-get install nginx
Okay the meeting this time we we will learn to make the local server on Ubuntu we use Nginx, MysQL, and PHP7. What's a LEMP? a bit about understanding the Linux MySQL Nginx IE LEMP PHP (LEMP or LNMP) is a group of open-source software to run a dynamic website, namely web that can perform interaction with visitors. LEMP was not much different from the LAMP (Linux, Apache, MySQL and PHP) because they have the same function, only to be replaced by apache web server nginx (Engine X) so changed its abbreviation became LNMP or LEMP. Okay just get started.
A. Install NGINX
Why use NGINX? currently NGINX have started widely used because it is faster and the way its configuration more easily than others.
type this command to install NGINX: # sudo apt-get install nginx
gambar 1. install nginx
type y to accept the installation.
gambar 2. approval to install nginx
then when it is finished checking service by entering the command
# sudo service nginx status
type y to accept the installation of mysql-server.
After the update is complete do the commands to install php 7.
the installation phases for LEMP on ubuntunya, if you experience any difficulties or obstacles when installed it can comment and ask the author will help to continue to share a useful science. see you in next post ...
gambar 3. status nginx
then open a web browser on ubuntu and then type localhost to perform checking of nginx is already active.
gambar 4. nginx sukses
B. Install MYSQL-SERVER
For database management we use mysql-server following installation stages.
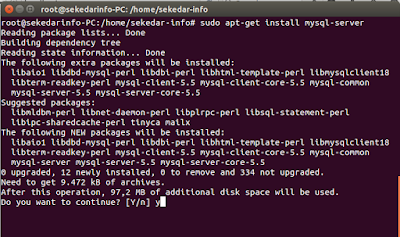
#sudo apt-get install mysql-server
gambar 5. install mysql-server
type y to accept the installation of mysql-server.
gambar 6. agree that installation
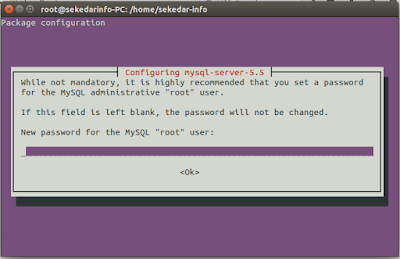
then input the desired password.
gambar 7. create a new password for the mysql-server
and then checking whether the mysql-server is already active or not with the following command.
# sudo service mysql status
gambar 8. mysql-server status
C. Install PHP 7
Why use PHP 7? PhP7 has the performance of two times faster than the previous version of PHP and 50% more efficient in memory usage. The following lamgkah-the steps of installation.
Do the following commands to add the package installs php place 7.
# sudo add-apt-repository ppa:ondrej/php
gambar 9. Add the php package for 7
After that the command update
gambar 10. perform the update
After the update is complete do the commands to install php 7.
# sudo apt-get install php7.0 php7.0-cli php7.0-fpm php7.0-gd
php7.0-json php7.0-mysql php7.0-readline
gambar 11. install php 7
After completion of the laukan configuration in nginx file so that php can read his 7 by nginx.
# sudo nano /etc/nginx/sites-available/default
gambar 12. perintah untuk konfigurasi php 7 di nginx
then follow the commands as shown in the picture to the php configuration 7.
gambar 13. konfigurasi file
service restart nginx.
gambar 14. restart service nginx
then create a file with the format .php in the folder as the image below that later we will call in a web browser to view information about php 7 we install.
gambar 15. konfigurasi file php
If it is then in the save. Open a web browser and then call with the url localhost/test. php if it succeeds then it will look like the image below. If this fails try repeat steps when configuring a php file.
gambar 16. information about php 7
the installation phases for LEMP on ubuntunya, if you experience any difficulties or obstacles when installed it can comment and ask the author will help to continue to share a useful science. see you in next post ...


awesome posts
ReplyDeletethank's
Delete